Blog | RAFTRx Roofing + Exteriors
Winter Roof Leak Repair: How to Stop Roof Leaks Fast Before They Cause Mold
Quick Summary
- Winter roof leaks get worse fast because cold weather traps moisture and creates perfect conditions for mold.
Watch for early warning signs like ceiling stains, musty odors, damp attic insulation, and peeling paint.
As soon as you notice a leak, protect your belongings, relieve ceiling pressure safely, document the damage, and call a professional roofer.
Roofers can track down the true source of the leak, repair damaged shingles/flashing, address attic moisture, and help you understand possible insurance options.
Regular inspections, clean gutters, and proper attic insulation/ventilation are key to preventing winter leaks before they start.
When winter hits, a small roof leak can turn into a big, expensive problem faster than you think. Between snow, ice, freezing rain, and temperature swings, water has plenty of chances to sneak into your home—and once moisture gets trapped inside, mold isn’t far behind.
If you’ve spotted a stain on the ceiling, a slow drip, or a musty smell, this guide will walk you through exactly what to do right now, how to spot hidden leaks, and when to call in a professional roofer before mold takes over.
Why Winter Roof Leaks Are So Dangerous
A roof leak is never good—but in winter, it’s especially risky because:
Water doesn’t evaporate as quickly in cold weather, so moisture lingers in your attic and walls.
Condensation from warm indoor air meeting cold roof surfaces adds to the problem.
Snow and ice sit on the roof longer, giving water more time to find its way in.
Hidden damp spots become a perfect breeding ground for mold and mildew.
Even a small, slow winter leak can lead to:
Stained ceilings and walls
Peeling paint and damaged drywall
Rotted wood and weakened framing
Musty odors and poor indoor air quality
Potential health issues for those with allergies or asthma
The takeaway: If you see a sign of a leak in winter, treat it as urgent—not something to “keep an eye on until spring.”
Common Causes of Winter Roof Leaks
Understanding where the leak is likely coming from can help you explain the issue clearly to a roofing professional and speed up repairs.
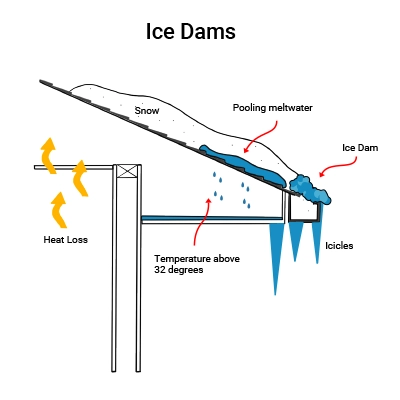
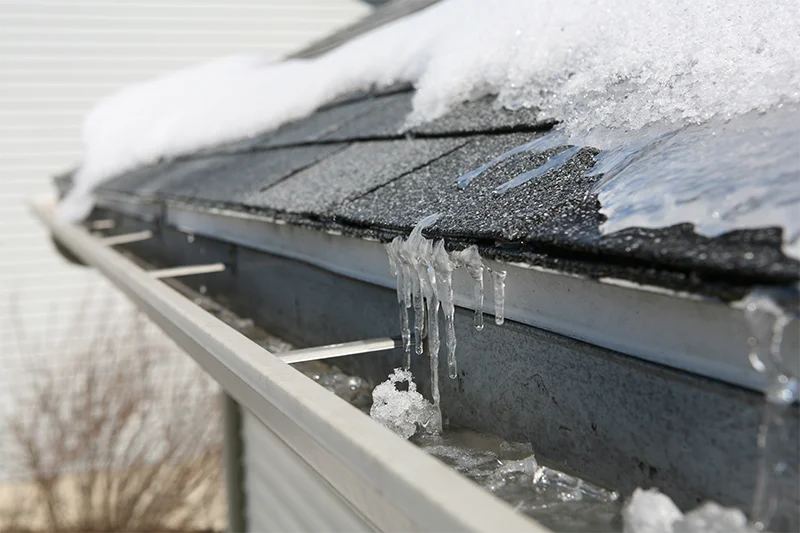
1. Ice Dams
Ice dams form when:
Heat escapes from your attic and warms the roof surface.
Snow melts and the water runs down toward the colder eaves.
That water refreezes along the edge, creating a “dam.”
As more meltwater flows down, it pools behind the ice and can back up under shingles, eventually leaking into your attic and ceiling.
2. Failing or Damaged Shingles
Strong winter winds, hail from earlier storms, or simple age can cause:
Cracked or curling shingles
Missing shingles
Exposed nail heads
Any gap or opening lets water in, especially when snow sits on the roof for days at a time.
3. Cracked or Loose Flashing
Flashing is the thin metal installed around:
Chimneys
Skylights
Roof vents
Valleys (where two roof slopes meet)
When flashing rusts, cracks, or pulls away, it leaves a direct path for water to enter.
4. Clogged Gutters and Downspouts
If gutters are packed with leaves and debris, water can:
Back up under the first row of shingles
Spill over and saturate siding and fascia
Contribute to ice dam formation
5. Condensation and Poor Ventilation
In cold climates, warm, humid indoor air can rise into the attic, where it hits cold surfaces and condenses. Over time, this can:
Make insulation damp and less effective
Create mold on rafters and sheathing
Make it look like a “roof leak” even if no water is coming through from outside

Early Warning Signs of a Winter Roof Leak
Catching a leak early is the best way to avoid mold and major structural damage. Watch for:
Brown or yellow ceiling stains (often circular or blotchy)
Dripping or water bubbles in paint or drywall
Peeling paint or wallpaper on upper walls
Damp or musty odors in the attic, upstairs rooms, or closets
Visible moisture in the attic, like wet insulation or darkened wood
Frost on nails or the underside of the roof deck in your attic
If you see any combination of these signs, assume water is getting in somewhere—and act quickly.
What to Do the Moment You Notice a Leak
Here’s a simple, homeowner-friendly action plan to minimize damage while you arrange professional repairs.
Step 1: Protect Your Belongings
Move furniture, electronics, and valuables away from the leak.
Put a bucket or large container under any active drip.
Lay towels or plastic sheeting on the floor to protect flooring and rugs.
Step 2: Relieve Pressure if the Ceiling Is Bulging
If you see a bulge in the ceiling (a water bubble forming under the paint or drywall):
Place a bucket or container directly underneath the bulge.
Use a screwdriver or nail to gently poke a small hole at the lowest point of the bulge.
Let the water drain into the bucket.
This feels scary, but it’s actually safer than letting water spread and cause the ceiling to collapse.
Step 3: Check for Other Hidden Leaks
Walk through your home and look at:
Upstairs ceilings and corners
Closets on exterior walls
Around window frames
The attic (if it’s safe to access)
If you can safely get into the attic, look for:
Wet insulation
Dark spots on wood
Drips coming from nails or seams
Take pictures and videos—these are extremely helpful if you end up filing an insurance claim.
Step 4: Call a Professional Roofing Contractor
Winter roof leak repair isn’t a DIY weekend project. Climbing on a slick, icy roof is dangerous for anyone without training and equipment.
Instead, call a local roofing contractor who:
Has winter and storm-damage experience
Can inspect both the roof and attic
Understands insurance claims for storm-related damage
If you’re in Georgia, South Carolina, North Carolina, Tennessee, Kentucky, Texas, Alabama, Nebraska, Michigan, Kansas, Missouri, Indiana, Ohio, Illinois, Wisconsin, or Pennsylvania a local RAFTRx brand can inspect your roof, track down the source of the leak, and help you understand whether insurance may help with the repair or replacement.
How Roofers Fix Winter Roof Leaks
Every home and leak is different, but here’s what a professional roofer will typically do.
1. Full Roof Inspection (Outside and Inside)
A good roofing contractor won’t just patch the obvious spot—they’ll:
Inspect the entire roof surface for missing, cracked, or lifted shingles
Check flashing around chimneys, skylights, vents, and valleys
Look at the gutters and downspouts for clogs or overflow patterns
Check the attic for moisture trails, mold, and ventilation issues
This helps them find the true source of the leak, not just where the water finally shows up inside.
2. Repair or Replacement of Damaged Materials
Depending on what they find, repairs may include:
Replacing missing or damaged shingles
Re-sealing or replacing metal flashing
Repairing or replacing rotted roof decking
Sealing penetrations around vents and pipes
If storm damage is extensive, your roofer may recommend a full roof replacement—especially if:
The roof is nearing the end of its lifespan
There is widespread hail or wind damage
Multiple leaks are found in different areas
In many storm-related cases, this may be partially or fully covered by homeowners insurance, depending on your policy and deductible.
How Fast Can Mold Grow After a Roof Leak?
One of the biggest myths about roof leaks is “I can wait until spring to fix it.”
In reality:
Mold can begin to grow on damp surfaces in as little as 24–48 hours in the right conditions (warmth + moisture + organic material like wood or drywall).
Even if you don’t see visible mold yet, hidden mold can form behind walls, above ceilings, and in insulation.
Signs that mold may already be forming include:
Persistent musty smells even when everything looks dry
Dark spotting on wood in the attic
New or worsening allergy or respiratory symptoms at home
Your roofer may recommend:
Removing and replacing soaked insulation or drywall
Improving attic ventilation to reduce future moisture build-up
Partnering with a mold remediation specialist if growth is extensive
The sooner you stop the leak and dry out the area, the less likely you’ll face major remediation costs later.
Preventing Winter Roof Leaks Before They Start
You can’t control the weather, but you can make your roof more ready for it. Here are some smart preventative steps:
1. Schedule Regular Roof Inspections
Have a professional inspection:
At least once a year, ideally in the fall
After any major storm with high winds, hail, or heavy snow
Inspections can catch:
Loose or aging shingles
Cracked or missing flashing
Early signs of decking or fascia rot
Ventilation or condensation issues
2. Keep Gutters Clean and Flowing
Clean gutters and downspouts:
In the fall after leaves drop
Again in late winter or early spring if needed
Clear gutters help:
Prevent water from backing up under shingles
Reduce ice dam risk
Protect siding, fascia, and the foundation from overflow
3. Improve Attic Insulation and Ventilation
A well-insulated and well-ventilated attic:
Keeps heat from escaping and warming the roof deck
Reduces the formation of ice dams at the eaves
Helps prevent condensation and moisture build-up
Your roofing contractor can evaluate whether your:
Insulation levels meet current recommendations for your climate
Ventilation (soffit, ridge, gable vents) is balanced and effective
4. Address Small Issues Immediately
If you ever spot:
A couple of missing shingles
A small stain on the ceiling
Minor dripping in the attic during heavy rain or snow melt
Treat it as an opportunity to fix a small problem before it becomes a big one. Many roof leaks start as tiny issues that were easy and inexpensive to repair earlier.
When to Call a Professional (and What to Ask)
If you’re noticing any of the winter leak symptoms we’ve covered—stains, drips, musty smells, or attic moisture—it’s time to talk to a roofer.
When you call, ask:
Do you have experience with winter roof leak repair and storm damage?
Can you inspect both the roof and attic?
Will you document any storm-related damage that might be relevant for an insurance claim?
Can you walk me through your findings and options in plain language?
With RAFTRx Roofing + Exteriors and our family of regional brands, you get:
Local teams who understand your climate and weather patterns
Roofers experienced in storm damage and insurance interaction
Clear, straightforward explanations about your options and costs
Don’t Wait Until Spring: Stop Winter Roof Leaks Now
Winter roof leaks rarely “stay small.” The combination of snow, ice, trapped moisture, and limited drying time means that:
A small leak in December can become a major mold problem by February.
Waiting until warmer weather often leads to more damage and higher repair costs.
If you’ve noticed any signs of a leak—or just want peace of mind before the next storm—now is the time to act.
Call RAFTRx Roofing + Exteriors today at (770) 299-1995 to schedule a winter roof inspection and leak evaluation.
We will:
Find the source of the leak
Explain your options clearly
Help you protect your home from further damage—and from mold—this winter and beyond.
Why Choose RAFTRx?
-
Free 20-point roof inspection: We leave no detail overlooked & check all critical roofing components.
-
Insurance expertise: We document storm damage and help you navigate claims from start to finish.
-
Local crews. National standards: Regional teams backed by centralized QA, training, and warranties.
-
Full lifecycle service: Inspection → Repair → Replacement → Warranty & Maintenance.
-
Speed after storms: Emergency tarping and priority scheduling following hail and wind events.